ConfigMgr and MDT OSD | Diving into BitLocker steps

Did you asked yourself about both Bitlocker encryption steps provided by ConfigMgr and MDT task sequences? Well, I did. So, when a customer asked me to include BitLocker encryption I made a few research about this theme to understand each of one differences between them. Below, I try to share a few knowledge about it.

ConfigMgr and MDT integrated scenario:

Let’s consider the scenario on having ConfigMgr integrated with MDT as a starting point, since this is the most used scenario in our customers (at least I hope).
For those who use OSD in that way, this is what you’ll find when you create an MDT Task Sequence in your ConfigMgr console:

027-001

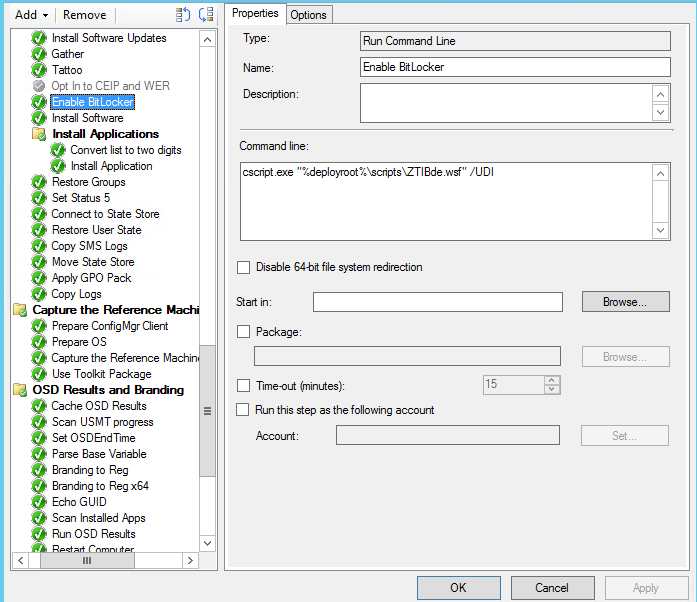
The presented “Enable BitLocker” step is nothing more than an execution of a ZTIBde.wsf script file (executed from the MDT Scripts Package).

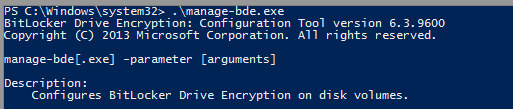
The script basically provide a full set of steps (like OS versions, Physical disks, etc.) to validate if the target computer is available for Bitlocker encryption. After performing all validations process, task sequence will start the encryption task using the Windows native tool named “manage-bde.exe” located in the %system32% folder.

027-012

As a last step, the script will place a text file with the Recovery password info into C:\ drive.

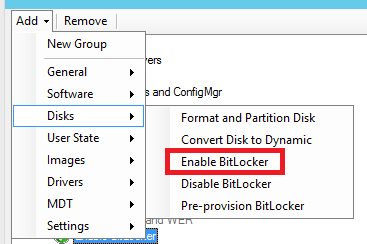
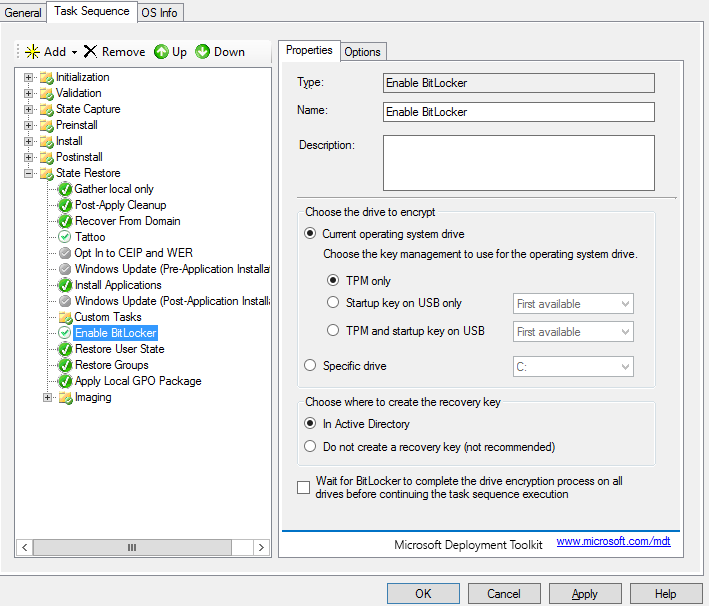
Otherwise, if you want to use the native ConfigMgr BitLocker step from Task Sequence, you can add it on the Disks option into the “Add” pane on top of the page.

027-002

Task Sequence will present the following properties pane as a simple wizard and very similar to the BitLocker page on UDI Wizard.
027-003

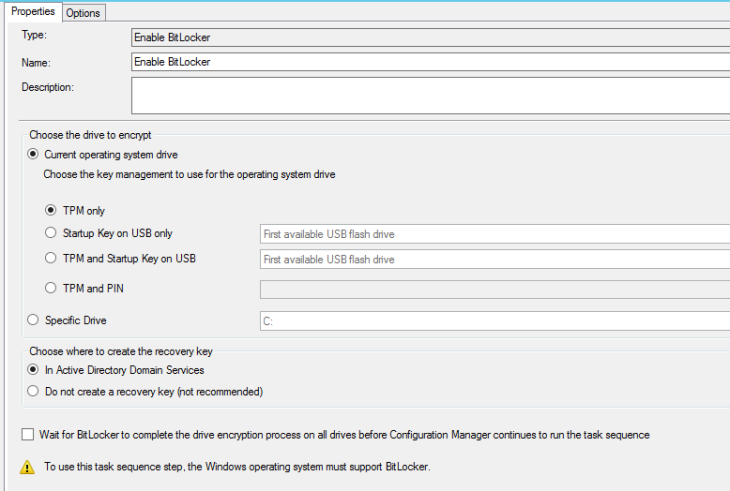
What will be performed here?

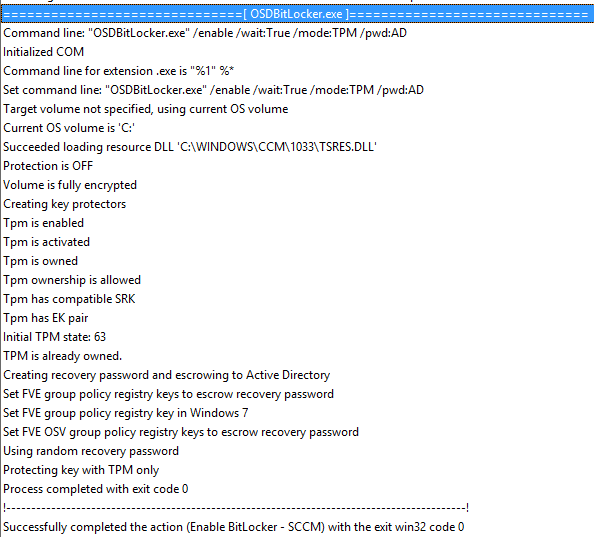
Not so visible like MDT does, but task sequence will run a tool named “OSDBitLocker.exe”. The tool is located into the ConfigMgr installation folder and is copied as a package during OSD process and will do the following steps:

  • TPM Validation;
  • Create the protectors (Recovery Password);
  • OS disk encryption;
  • Set the recovery password to AD (if configured).

027-004

Diving into smsts.log
027-007

MDT Lite Touch:

As you probably know, this is my favorite deployment type. Not only because this is the faster way to deploy customized Operating system images, but is the cleanest and easiest way (with no dependencies) to deploy Windows.
So, when we create a task sequence, this is what we’ll see:
027-010
And for options pane, MDT provides us:
027-011
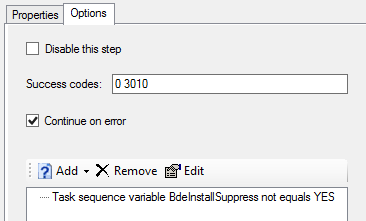
Not difficult to understand, because this is shown in a “Wizard” mode and the variable “BdeInstallSuppress” shouldn’t be YES (via CS.ini or TaskSequence variable).

Additional tip 1:

Since “manage-bde.exe” is a native Windows tool you just can test it in an isolated Laptop/workstation to test it (not with VMs. Check additional tips to understand it better).

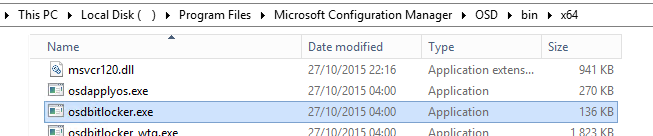
In the other hand, if you want to test the OSDBitLocker tool in a completely offline and outside of deployment process, avoiding the wasted deployment duration, just copy the required files and put them in an external USB (for example).

Execute the following command:
027-006
And wait for the BitLocker encryption to be done.


Additional tip 2:

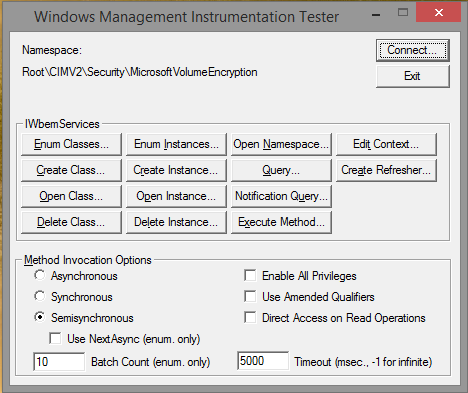
Are you thinking of using this on a VM? You don’t need even to try it. The script will check the physical volumes through WMI and the process is fully explained below.
Namespace: Root\CIMV2\Security\MicrosoftVolumeEncryption
027-008
Query: SELECT * FROM Win32_EncryptableVolume
027-009
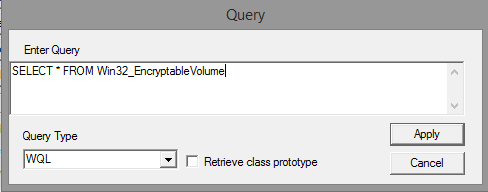
We you select the “Apply” option, it will be shown every encryptable drives in the current machine.
Try it in a virtual machine to see the reason why it fails every time on them. 🙂

Happy deployments!
/ Fabio

ConfigMgr and MS Intune lab creation – Here comes the end of the saga…plus the resume!

As promised, the (seven) previous posts can be a good starting point of Microsoft Intune.

Hope provide you all the required steps to build a laboratory to set a first experience on Intune and Config Mgr.

Once that the first saga becomes to the end, here it goes a few resume:

As an Intune / Azure / Config Mgr enthusiastic, I’ll keep focused on these technologies, so… Stay tuned! 😉

/ Fabio

ConfigMgr and MS Intune lab creation – 7th Part | iOS device Enrollment: step-by-step guide

This post intends to share my personal experience on iOS device enrollment into the Mobile Device Management Platform: Microsoft Intune.

As we know, besides to the Windows Phone, the iOS enrollment requires:

  • Apple Push Notification Certificate import;
  • The “Company Portal” app installed. Company Portal is the first element to establish contact between mobile device and Intune infrastructure.

Once the first pre-requisite was been fully described on the previous post, let’s take a dive into the second one.

Step-by-step guide:

After the manual installation of the company portal app (as a mandatory pre-requisite), you can open it and enter your Intune credentials (of an Intune user previously created and licensed). Forgot how to do it? Follow this.

Note: Once the page recognizes your tenant, will resolves to your customized branding.

020-001

You’ll be asked to enroll your device.

020-002

You’ll get the first “loading” message: “Enrolling device”.

020-003

After a few seconds later, you’ll be redirected automatically to the “Settings” page, with a Management Profile installation prompt window. Select “Install”.

020-004

Confirm the profile installation.

020-005

And confirm it again.

020-006

And again.

020-007

After a few seconds, you’ll receive the successfully “Profile Installed” message. Press “Done”.

020-008

And the “Device Enrolled” final message too.

020-009

The first synchronization will start in a few minutes.

020-010

On Config Mgr console, the behavior shall be similar for the Windows Phone and iOS – the mobile device may took some minutes to show up.

020-011

Note: As always, all posts reflects only my point-of-view and is provided “AS IS” with no warranties, confers no rights and is not supported.

Stay tuned and enjoy EMS!

/ Fabio

ConfigMgr and MS Intune lab creation – 6th Part | iOS device Enrollment: Pre-Requisites

As you probably noticed, to perform iOS device enrollment, you need to setup a pre-requisite into your Config Mgr platform (integrated with MS Intune): Apple Push Notification Certificate.

Lab assumptions:

  • System Center Configuration Manager 2012 R2 SP1 (or SP2);
  • Microsoft Intune subscription added;

On Config Mgr, follow the path “Administration > Overview > Cloud Services > Microsoft Intune Subscriptions

Through the ribbon, click on “Create APNs certificate request“.

019-001

You’ll be asked to set a path/filename to save the generated (.csr) file by Config Mgr and you’ll warned for the next steps also.

Press “Download”.

019-002

Introduce your “tenant admin” credentials and wait for the message. Don’t close this screen.

Now, click on the blue available link “Apple Push Certificate Portal”.

019-003

It will be opened an IE screen. Enter your Apple ID. If you don’t have one, create it. It’s free.

019-004

Once you’re in the portal, click on the right option named “Create a Certificate”. Upload the generated (.csr) file by Config Mgr.

019-005

Browse for the (.csr) file.

019-006

Backing to the Apple Push Certificate Portal, you’ll see a new entry! Click “Download” and save the Apple generated .pem file.

019-007

Through the path “Administration > Overview > Cloud Services > Microsoft Intune Subscriptions”, click at the ribbon “Configure Platforms” > “iOS”

019-008

Check “Enable iOS enrollment” and “Browse” for the .pem file downloaded on the Apple Certificate Portal. Apply these changes.

019-009

If you’re using your Intune subscription in a Cloud-Only mode, following this link.

You’re Config Mgr platform now supports iOS device enrollment.

Note: As always, all posts reflects only my point-of-view and is provided “AS IS” with no warranties, confers no rights and is not supported.

Enjoy EMS and stay tuned!

/ Fabio

ConfigMgr and MS Intune lab creation – 5th Part | Step-by-step: Enroll Windows Phone 8.1 device

As promised, this post intends to share my experience on a Windows Phone 8.1 device enrollment, but firstly want to share the following table which resumes all certificate requirements for each mobile OS version.

Note: Once you’ll enroll a Windows Phone 8.1 device, there are no certificates needed (for device enrollment).

Operating System Supported Version Enrollment Certificate Requirement Notes
Windows Phone 8 Symantec
Windows Phone 8.1 Not required Symantec certificate required if you want to Deploy LoB apps;

Symantec certificate required if users won’t have permissions to download Company Portal App from the Windows Store.

Android 4.0+ / Knox Not Required
iOS 6.0+ Apple Push Notification service certificate

Note: This link contains detailed information about it.

Set Windows Phone 8.1 management in Config Mgr

On Config Mgr, we can set which operating system(s) we want to manage. We’ll configure to support Windows Phone 8.1 management.

Through the Config Mgr Console, follow the path “Administration > Overview > Cloud Services > Microsoft Intune Subscriptions” and click at the ribbon “Configure Platforms” > “Windows Phone”.

Validate if the “Windows Phone 8.1 and later” option is already checked. If not, check it and Apply changes.

018-001

Windows Phone 8.1 device enrollment

This is really easy to do as you’ll see. For this example, I used a simple Nokia Lumia 520.

Path: “Settings > workplace”

018-002

“add account”

018-003

Logon with the Intune account created for this. (Remember the one that was been created on the previous post?!)

018-004

You’ll be redirected automatically to a page which will recognize your tenant branding. Insert your password and select “Sign in”.

018-005

Wait a few seconds and you’ll get the successfully message.

018-006

018-007

On the Config Mgr side, you can check the log “<ConfigMgrInstallationPath>\Microsoft Configuration Manager\Logs\cloudusersync.log” to get more details about the certificate that was generated on the Phone.

018-008

On Config Mgr Console, will take a few minutes until shows the new Windows Phone.018-009

Note: To see more details about it, check this link.

So, what about iOS enrollment? Wait for the next post. 🙂

Enjoy EMS and stay tuned!

/ Fabio

ConfigMgr and MS Intune lab creation – 4th Part | UPN for Cloud Domain and Intune Licensing

Keeping our focus the continue our MS Intune subscription integrated with Config Mgr lab, this post intends to share:

  • AD “on-premises” customization to support “cloud” authentication;
  • Setting Intune licenses management for groups automatically;

Since the users will be authenticated into the cloud with a different suffix that they have “on-premises”, we need to add the UPN of the cloud domain. This means that we need to add the <customizedtenant.onmicrosoft.com> on our AD “on-premises”.

To do that, use “Active Directory Domains and Trusts”.

Right click on the first left option, then select “Properties”.

017-001

On the only available tab – “UPN Suffixes” – add your <customizedtenant.onmicrosoft.com>.

Apply it.

017-002

Now, go to “Active Directory Users and Computers” and create a User. In my case I named it “intuneuser1”

On the “Account” tab, change the suffix of the “User logon name” (always known as UPN) to <customizedtenant.onmicrosoft.com> – set previously on this post.

This change is required to allow the user to authenticate into the cloud.

Set a password which will be replicated to the Azure AD.

017-003

Add it to the AD Group created specifically to Intune and used on the SCCM Collection also (see the previous post).

In my case, I named as “Intune” (I know, I’m not very creative).

017-004

We need to sync these changes right now.

You probably noticed that during Azure AD Connect installation, a Task Scheduler entry was been created. This Task Scheduler is responsible to handle all synchronizations between AD “on-premises” and Azure AD.

The schedule time by default is configured to synchronize both AD’s every 3hours, but is disabled by default as well. Once this is a lab, and never forgetting our focus as usual, we must enabled it, run it and disabled afterwards.

017-005

Note: Is always a good idea to check the log with the Azure Synchronization service > Operations and then check those changes through Azure AD Portal also.

Set licensing – Microsoft Intune

Access to Azure Management Portal.

Click Active Directory and select your tenant directory.

On the top bar, choose the last option: Licenses.

017-006

Click on “Intune A Direct”. The default is 100 Intune licenses to distribute so is perfectly enough for our tests.

017-007

Click on “Assign Users” green option.

Set “Show” to list “All Groups”.

On this screen, your sync AD Groups must be listed. Select the one you set for the Intune users and click “Assign” on the bottom page option.

017-008

For now, you’ve your (Intune) AD group assigned for Intune licensing. You don’t have to set individual licensing.

Following the question on the previous post, it makes more sense manage groups instead of individual users.

Did you remember the last question post? Check the previous post if you don’t.

On the next post, I’ll share my experience of a mobile device enrollment into my lab.

Enjoy EMS and stay tuned!

/ Fabio

ConfigMgr and MS Intune lab creation – 3rd Part | Configuring SCCM

Continuing our “Saga” to have a MS Intune lab integrated with Config Mgr, let’s do the required configurations on SCCM.

So, this post is completely focused on Config Mgr and will be really short, because in fact, there are few and simple steps to do:

  • Configuring a Query to search users based on a specific AD Group;
  • Creating a User Collection (based on the previous created query) to be used for MS Intune;
  • Adding Microsoft Intune Subscription into Config Mgr;
  • Adding Intune Connector role.

As a Pre-Requisite, use the last supported version of Config Mgr: 2012 R2 SP1 / SP2 (With CU1 applied as a recommendation).

Why do I suggest to use a Collection based on specific AD Group?

Because it will make the Microsoft Intune licensing association simpler. In the near future, when you’ll need to set MS Intune licenses to your “employees”, will be easier to manage for Groups instead of single users. So, on the Microsoft Azure Portal, you can set Microsoft Intune licenses to a specific AD Group (which needs to be migrated to the cloud of course). Once this group is licensed to Microsoft Intune, the only thing you’ll need to do consists on managing this group. Otherwise, you’ll probably will die associating each license per each user (and you don’t want that).

Confused? On the next post, you’ll understand better this suggestion and the associated mindset as well. On the other hand, if you want, you can skip it and just create an empty User Collection.

Creating Query based on AD Group

  • Create an Active Directory Group User Group to be used by Intune;

Create a similar query and replace “DOMAIN\\GROUPNAME” values.

016-001

Query:

select SMS_R_User.Name, SMS_R_User.UserName, SMS_R_User.WindowsNTDomain, SMS_R_User.NetworkOperatingSystem, SMS_R_User.AgentName, SMS_R_User.AgentSite, SMS_R_User.AgentTime, SMS_R_User.ResourceId, SMS_R_User.ResourceType, SMS_R_User.UniqueUserName from SMS_R_User where SMS_R_User.UserGroupName = “DOMAIN\\GROUPNAME”

Now, you can create a User collection based on this query.

Keep in mind that this collection have a single target and should not be used for any deployments (or any Advertisements as an old fashion term) and should have no members as well.

Adding Microsoft Intune Subscription on ConfigMgr:

Following the path: “Administration > Overview > Cloud Services > Microsoft Intune Subscriptions”. Now, choose “Add a Microsoft Intune Subscription”

016-002

Will be opened the following screen.

016-003

And you’ll be asked to “Sign In”.

016-004

This is an important warning: All mobile device management will be part of Configuration Manager now. According to that, all policies, profiles and so on will be created and managed on the SCCM side and this cannot be changed anymore.

016-005

It will redirect to the IE Session to get the Microsoft Intune credentials (you must logon with Tenant admin for this).

016-006

Add insert the collection created previously (User collection).

016-007

It looks like you need to add a Site System role. Let’s do this.

016-008

Through the path: Administration > Site Configuration > Sites > Add Site System Roles

Check “Microsoft Intune Connector”.

016-009

Quite simple, right? 🙂

Enjoy EMS and stay tuned!

/ Fabio

PXE – How to Suppress F12 at PXE Boot

Firstly, I want to assume that this post could be nice for Lab Environments, but it is not recommended at all for Production Environments.

During my lab tests, I was trying to start multiple deployments at the same time and for several times I came “late” to F12 for PXE (And I got the image below).007-001


However, after some quick research, I could make my life easier and avoid the “F12” after capturing de IP through DHCP Server simply.

ConfigMgr 2012

  • Find the «PXE RemoteInstall folder» and find the following specific locations:
    • <driveletter>\RemoteInstall\SMSBoot\x64
    • <driveletter>\RemoteInstall\SMSBoot\x86
  • Inside of each folder, you’ll find a file named “pxeboot.com”. Rename these two files to “pxeboot-old.com”.

On one of each folder rename now the “pxeboot.n12” to “pxeboot.com” and overwrite the existing file(s)

007-002

  • A WDS Service restart is not required but suggested.

If you’re concern about the security (even in Lab Environments), please don’t think about it. Just protect your PXE deployments with a password on step “Require a password when computers use PXE” to get always a «Secure Stop» on WinPE.

007-003

And your life will be much easier.

007-004

And your Task Sequence List won’t be shown until you enter the PXE password. – “Secure Stop”

007-005

MDT Lite Touch

For Lite Touch is even simpler (as always). Just browse Properties for the WDS Server, find the Boot tab and set the “Always continue the PXE boot” for Known and Unknown clients. In addition, you can set a default boot image for each architecture.

007-006

Very Important Note: Be aware of Boot Sequence Order to ensure that the LAN component does not run before the Hard disk. If you have it, each time that the Task sequence reboots the machine, it will enter on the PXE menu and never finishes it. Again, this is only recommended for Lab Environments to accelerate your tests. For Production, it’s not a good idea at all!

Enjoy your PXE Boot! 🙂

/ Fabio

BitLocker info during Task Sequence – HTA

Currently, my team were asked about a way to get some info related to BitLocker during task sequence.

The main idea was identifying in some custom phase of the task sequence the status of the encryption of the physical disks (assuming that we’re encrypting the physical volumes during the sequence).

Our suggestion was to set a custom hta (html application) which do some queries through vbscript and post it in the End.

The script is quite simple. Just kept the main focus of capturing the values of the WMI query. Below, an example to do that:

006-001

Just including this part of the script into an HTA application.


The result:

006-002

It is a simple vbscript behind of the scenes but can enhance your Task Sequence and show some powerful of the main concern about many IT Managers.

Note: However, you can include different fields to the HTA. To get the all list of the available fields for BitLocker through WMI, please run the below script on PowerShell.

006-003

Enjoy your deployments!

/ Fabio

Create HTA for WinPE to Set Keyboard Layout and Protect Task Sequence with a Password

Imagine the following scenario: You need to deploy a sequence for many languages and you need to protect it with a password into WinPE. How to do it?

At first, and for sure, there’s nothing developed by Microsoft which can help you at this point.

If you need something similar, the following lines must be gold for you, for sure 🙂

First Part:

Create an HTA which allow to set many languages on WinPE (Through a Drop Down List)

 hta-languagesettings

Second Part:

Protect the Task sequence with a Password that will be inserted in a keyboard format selected before!

 hta-passwordprotection

But, how to do it? Quite simple.

Our sequence just need to have three steps in the first group to do it, as the image below shows:

The first step must define the password for sequence (through the “Set Task Sequence Variable”)

 ts-settwoHTAs-forKeyboardLayout

The next ones run two packages with two HTA’s with abilities to be executed on WinPE

  • Ask user to select a WinPE keyboard language:

Basically, and in a very quickest way to describe it, the HTA uses the “wpeutil” library to set the “keyboardlayout” property for a specific language, as the following image shows:

 partofscript-setKeyboardLayout

In this specific demonstration, i selected the French language layout, but you can selected one of those in this extended list provided by Microsoft: http://msdn.microsoft.com/en-us/library/ms912047%28v=winembedded.10%29.aspx

Note: The design of HTA and the main credits of it must be given to Johan Arwidmark e his fantastic post on codeplex! http://prettygoodfrontend.codeplex.com/

  • Ask user to insert a password for Deployment!

You don’t need to invent nothing for that. I used the fantastic post on the following link and just adapted to use a variable given by task sequence otherwise to use it directly on package (less secure in my opinion)

http://managedux.com/2011/06/20/adding-a-password-to-a-single-pxe-boot-task-sequence/

 script-tsProtection

Enjoy your deployments

/ Fabio